While you can install WordPress on your IX Web Hosting account using EasyApps, it is sometimes a little bit outdated so you need to proceed with the installation manually. In this tutorial, you will learn how to create a MySQL database and install WordPress from scratch.
Here is the Step by Step.
1. CREATING A MYSQL DATABASE
Before you can proceed with the installation of WordPress, you’ll need to create a MySQL database. Here’s how to do this:
1. Click on the“Manage”button from your IX WebHosting control panel:


2. Next, click on the “MySQLServer” icon just below “Databases”:

3. Click on “Add Database”:

4. Enter a name and a description for the database and click on “Next”:

5. In order to access theMySQL database, you will now need to create a MySQL user. Enter a user name and a password and select the “read/write” user role. Click on “Add User”:

6. In order to make sure that the MySQL user has all the necessary privileges, go back to the MySQL Server (see step #2) and scroll down to “Database Users” at the bottom. Click on “Edit” next to the MySQL user you’ve just created and check all the privileges as follow:


7. Click on “Submit” to apply the MySQL privileges.
Now that the MySQL database has been created, you can proceed with the WordPress installation.
2. INSTALLING WORDPRESS
Installing WordPress manually is pretty straightforward. Here’s how to do it:
1. Go to http://www.wordpress.org and download the latest version of WordPress to your computer:


2. Extract the files from the archive to a temporary folder on your computer using your favorite file compression software (Winzip, WinRAR or ZipGenius). On the Mac the files should automatically be extracted in your downloads folder in a folder called “wordpress”
3. Using an FTP client such as Filezilla (I use cyberduck on the Mac), establish a connection to your IXWebHosting account and double-click on your website directory:

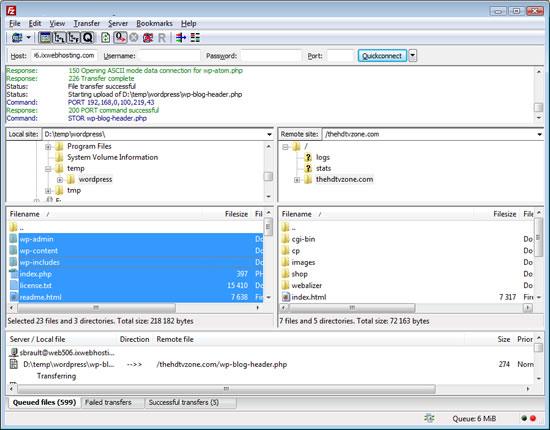
4. Select all the WordPress files on your local computer and drag them to your IXWebHosting account to start the upload:

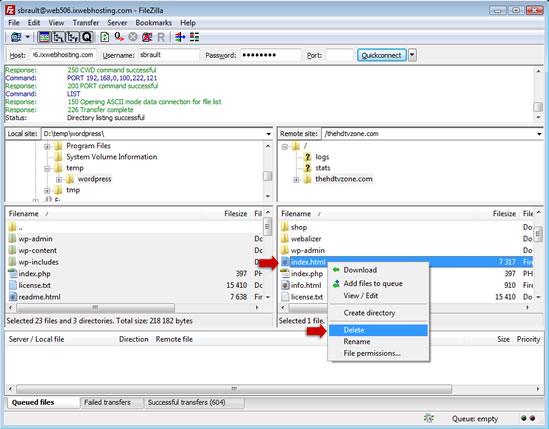
5. If there is a file named “index.html” in the public directory of your hosting account, you must delete it:

6. Using your web browser, open your website’s homepage (i.e. www.YourWebSite.com) to launch the WordPress installation wizard.
7. Click on “Create a Configuration File”:

8. On the next page, click on “Let’s go!”.

9. Enter the MySQL connection details and click on “Submit”:

10. On the next page, click on “Run the install”.

11. Enter the information about your new blog. Do not forget to use something other than “admin” for the user name as it is too easy to guess and will make your blog vulnerable to brute force attacks!

12. Click on “Install WordPress” to complete the installation. You now have a brand new WordPress blog running with the latest version.

Just one of the many reason I like IX Web Hosting
Happy Holidays from IX!
Raise your hand if you spent the last few days running around like crazy, buying, wrapping and giving gifts for what feels like forever. A lot of really tired hands just went up at IX!
We do all this running around, buying presents, making food, trying and failing to avoid crowds,because we want to see the people we love smile!
The “smile countdown” has officially begun. And this year, the IX team got together to make 127 disadvantaged kids smile, and smile they did!
Supporting the Franklin County Children Services Holiday Wish charity has become an IX family tradition, and this was our most successful year to date!
Have you ever seen what a X-Mas Tree made out of gifts looks like? Watch below.

